Creating Content: Keywords, CIPs & ARPs
This guide covers the hands-on workflow for creating lesson content on the Living Canvas. You'll learn the curly bracket syntax for marking keywords and topics, how to use the toolbar buttons, and how to generate ARPs with AI.
The Curly Bracket Syntax
The Living Canvas uses curly brackets { } to mark important content. When you Preview or Wrap a session, these brackets are parsed into styled, tagged elements that get saved to your student's learning record.
Single Curly Brackets: Keywords
Wrap a single word in single curly brackets to mark it as a keyword:
Today we practiced using {albeit} in a sentence.
When previewed, albeit appears highlighted as a keyword.
Single Curly Brackets: Keyphrases
Wrap multiple words in single curly brackets to mark them as a keyphrase:
The student struggled with {phrasal verbs} this session.
The system automatically distinguishes single-word keywords from multi-word keyphrases based on word count.
Double Curly Brackets: Topic Tags
Wrap text in double curly brackets to create a topic tag:
{{Business English}}
Let's review vocabulary for meetings and presentations.
Topic tags organize your canvas into sections. At least one topic tag is required before you can wrap a lesson.
Quick Reference
| Syntax | Type | Example | Result |
|---|---|---|---|
{word} | Keyword | {albeit} | Single vocabulary item, highlighted green |
{multiple words} | Keyphrase | {phrasal verbs} | Multi-word phrase, highlighted blue |
{{text}} | Topic Tag | {{Grammar Review}} | Section organizer, displayed as tag |
Make sure every opening bracket has a matching closing bracket. If brackets are mismatched, Preview will show a warning and won't proceed.
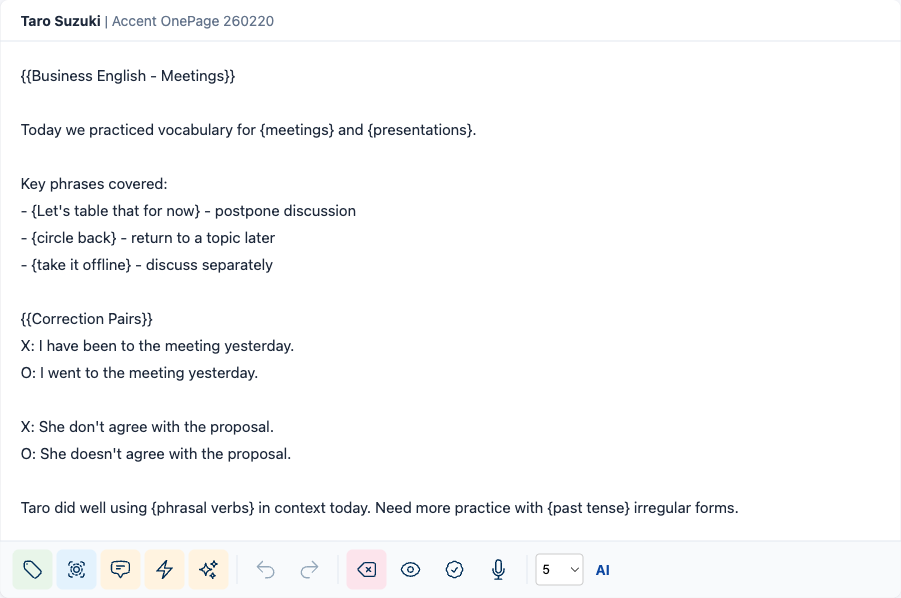
The Canvas Toolbar
When a session is active (status: "booked"), a row of buttons appears below the canvas editor. These buttons help you format content without typing brackets manually.

Formatting Buttons
| Button | Icon | What It Does |
|---|---|---|
| Topic Tag | Tag icon | Select text, click this button -- wraps selection in {{ }} |
| Keyword | Key icon | Select text, click this button -- wraps selection in { } |
| Search Google | Search icon | Select text, click this button -- opens Google search for the selected phrase in a new tab |
| Flashword | Flash icon | Opens a flashcard view of the selected word |
| AI Search | AI icon (small) | Select text, click this button -- opens Perplexity AI search for the selected phrase |
How to use: Highlight text in the editor, then click the desired button. The text is wrapped in the appropriate brackets automatically.
Session Control Buttons
| Button | Icon | What It Does |
|---|---|---|
| Undo / Redo | Arrow icons | Undo or redo your last formatting action |
| Clear Format | Eraser icon | Removes curly bracket formatting from selected text |
| Preview | Eye icon | Parses all { } and {{ }} into styled, color-coded elements |
| Cancel Preview | White eye icon | Returns to raw editing mode (appears after Preview) |
| Wrap | Wrap icon | Ends the session -- saves all content to the database |
| Record | Microphone icon | Start/stop voice recording during the lesson |
AI Assist (ARP Generation)
If you have an AI provider configured, two additional controls appear at the end of the toolbar:
| Control | What It Does |
|---|---|
| ARP Count dropdown (3 / 5 / 7 / 10) | Choose how many ARPs the AI should generate |
| AI button | Generates ARPs from your canvas content using AI |
Creating Correction Pairs (CIPs)
Correction pairs capture real mistakes from conversation and pair them with the correct version. They are the foundation of the Living Textbook methodology.
How to Add a Correction Pair
- During the lesson, note the student's error and the correct form
- In the canvas, correction pairs are entered as structured blocks with an incorrect phrase and a correct phrase
- The system visually distinguishes them (incorrect is marked, correct is highlighted)
Capture correction pairs in real time as they happen in conversation. Don't wait until after the lesson -- the most valuable corrections come from authentic speaking moments.
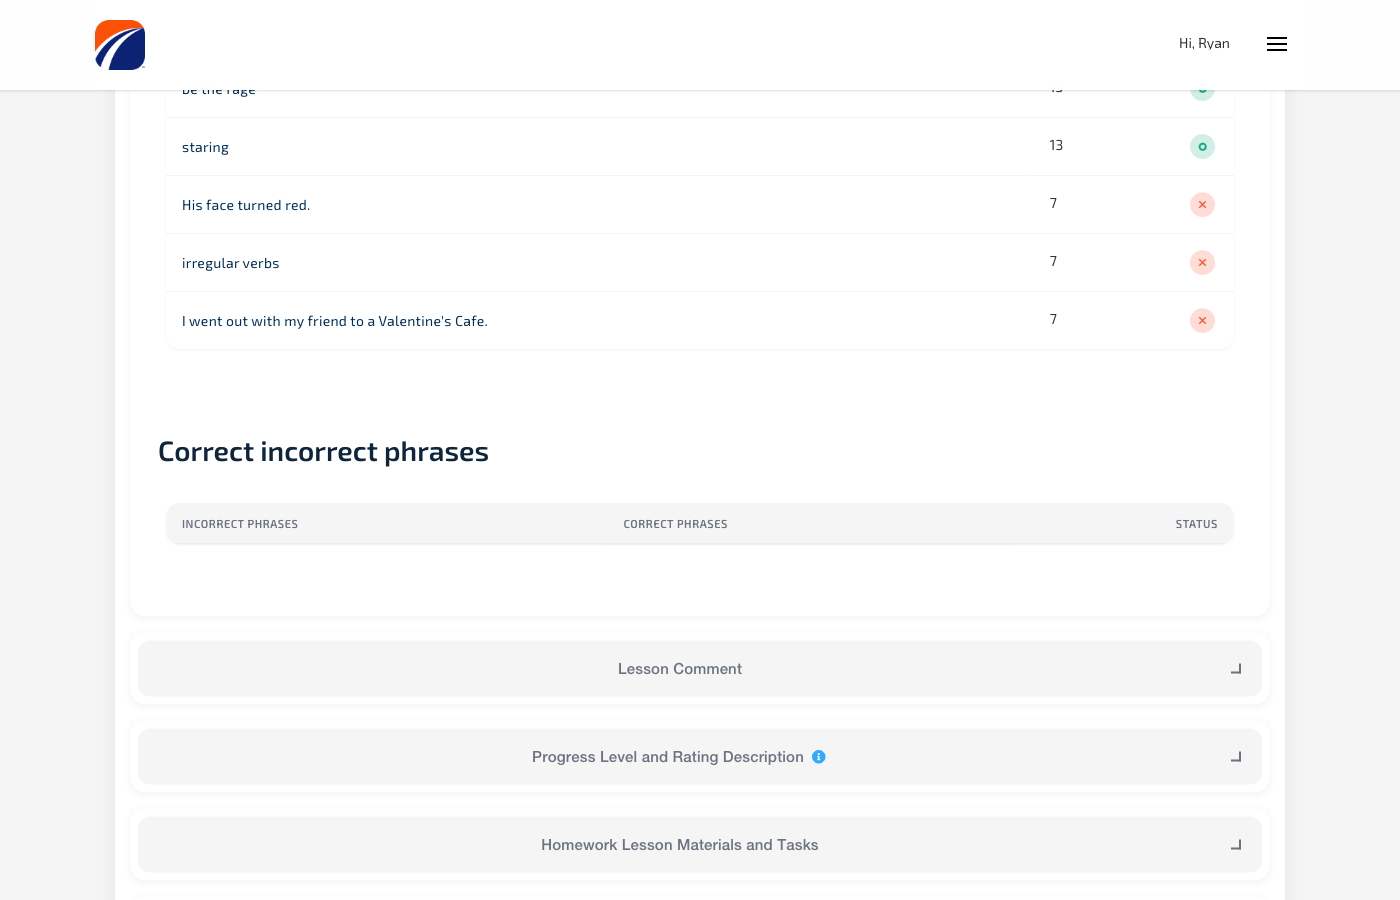
What Happens to CIPs
When you Wrap the lesson, all correction pairs are:
- Saved to the student's learning record
- Available in the session review under Correction Pairs
- Fed into AI analysis for progress assessments and ARP generation
- Visible to the student in their lesson materials
Creating Active Recall Pairs (ARPs)
ARPs are question-answer pairs that reinforce learning through active recall. There are two ways to create them.
Manual ARPs
Type ARPs directly on the canvas as question-answer blocks:
- Question: "How do you say 'meeting' in formal Japanese?"
- Answer: "会議 (kaigi)"
AI-Generated ARPs
This is the faster method. AI analyzes your entire canvas -- notes, keywords, keyphrases, and correction pairs -- to generate relevant question-answer pairs.
Step by step:
- Write your lesson notes on the canvas, marking keywords with
{ }and topics with{{ }} - Add any correction pairs during the lesson
- Select how many ARPs you want from the dropdown (3, 5, 7, or 10)
- Click the AI button on the toolbar
- If you use Fathom AI, the system first fetches the meeting transcript for richer context
- AI generates ARPs based on your canvas content
- Generated ARPs appear on the canvas and can be edited or removed with Undo
AI-generated ARPs use your configured AI provider (Anthropic Claude, OpenAI, or OpenRouter). The keywords and keyphrases you mark with curly brackets directly influence the quality and relevance of generated ARPs -- the more you tag, the better the output.
How Keywords Feed into ARP Generation
When AI generates ARPs, it receives:
- All text on the canvas (your lesson notes)
- Every
{keyword}and{keyphrase}you marked - Every
{{topic tag}}for context - All correction pairs from the session
- Fathom transcript (if available)
This means marking keywords isn't just for organization -- it directly improves AI output. The AI prioritizes creating ARPs around your tagged vocabulary and phrases.
The Preview and Wrap Workflow
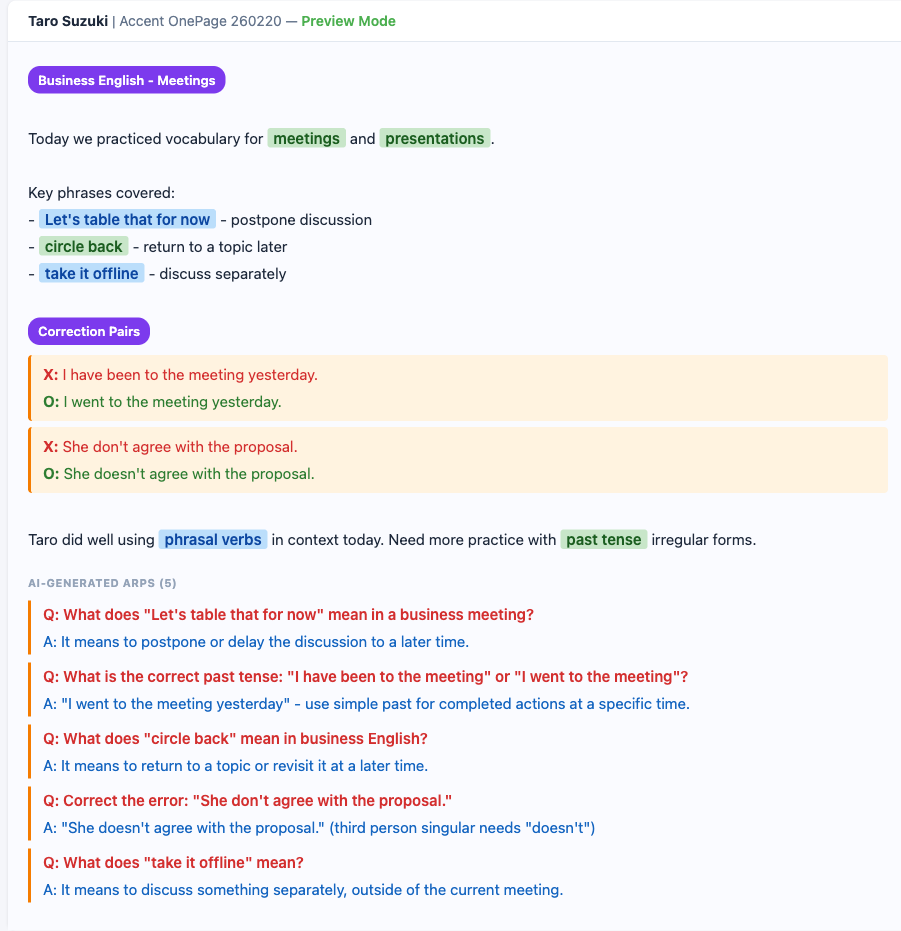
Preview
Clicking Preview (eye icon) transforms your raw text into a styled view:
- All
{{ }}become colored topic tags - All
{ }become highlighted keywords (green) or keyphrases (blue) - The editor becomes read-only so you can review
- Click Cancel Preview (white eye icon) to return to editing
The raw editor text (left) transforms into a styled preview (right) when you click Preview:
Wrap (End Session)
Clicking Wrap (wrap icon) ends the session and saves everything:
- The system validates your content (at least one topic tag is required)
- All keywords, keyphrases, topic tags, ARPs, and correction pairs are extracted
- Everything is saved to the student's learning record
- The session status changes from "booked" to "completed"
- You're taken to the session review screen
Wrapping is a one-directional action -- it ends the live session. Make sure all your notes, corrections, and ARPs are on the canvas before wrapping.
Complete Lesson Workflow Example
Here's a typical session from start to finish:
- Start session from the dashboard
- Add a topic tag: Type
{{Phrasal Verbs}}or select text and click the Topic Tag button - Take notes as the lesson progresses
- Mark keywords: Type
{look up},{put off},{carry out}or highlight and click Keyword - Capture corrections when the student makes errors
- Click AI to generate 5 ARPs from your notes and keywords
- Review the generated ARPs, edit if needed
- Preview to check everything looks right
- Wrap to end the session and save all content
The student now has a personalized lesson record with tagged vocabulary, correction pairs, and active recall questions -- their Living Textbook grows with every session.